Hi all and welcome to another exciting week of seeing so of Imagine Ifs new products on display
If you have come from Tash`s Blog then your in the right place, if not you need to start at Imagine Ifs
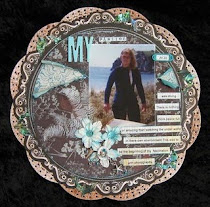
This week I have done a canvas, using two of Imagine If stencils to
make my back ground. See below.
A lot of stencils haven't been loaded
onto the shop yet as poor Jo hasn't had a chance to catch here breath yet,
So just e-mail her and ask if you would like one until they are up.
I also used a frame and corner piece`s and then painted over them
as I wonted them to blend in and be a part of the back ground
Next I used 3 different sprays. Tattered angels glimmer mist "tiger lily"
and "sunshine. To get a little more darkness in the corners I used
Dylusions "black marble. You can see the back ground show here.
This is just a close up for you
I then used a small piece of bubble wrap which I inked with
jet black archival ink and doted it about randomly .
I had a play with a few flower :) as you do
I knew I wonted to use this awesome dress form and the words "vintage girl"
and maybe the key, but decided the key was to much
Added half a film strip and some cogs which held the Tim Holts film strip.
The gorgeous lades I cut from a paper arts paper arnt they so cool :)
This is a super close up so you can see my back ground.
Oh and I covered the dress form ( which is stunning on its own)
with some bits I had in my stash and used Good old Tims
distress ink on the lace to show the pattern up more and help
it blend in.
If you would like to check out the Imagine If online outlet
Thanks for playing along with us this week. Your next stop in the hop is
Just a quick demo on how to get the raise back ground using a stencil
This is a stencil I had on my table, it just arrived from Imagine If .
with this one I am doing a specific area, but when doing a back ground
with a pattern I jut hold the stencil down and randomly apply the past.
The pot below is what I have been using, there are a few different
types, this one dries clear, some dry white, it has a very thick consistency
With this stencil I have used some masking tape to cover the top
part so the past doesn't go through as im pretty rough lol
I have covered around the edges so I can use my mister to colour
the back ground.
Back ground has been done
Next I will place the wing pattern part over my back ground of
blue spray as below
Then using some thing with a nice clean flat edge (I am using an old credit card)
scoop out some past and spread it over the stencil until all the gaps are full.
Then carefully remove the stencil and there you have your raised surface.
When doing a back ground (all over pattern) when this is dry,
you cab paint it or use sprays.
Here I just wonted to show you the raised edge
Have a play, this is a fun process .
a Rafflecopter giveaway
Giveaway | Rafflecopter :)